The arrival of ancient Boras by drop pod signaled the beginning of the battle.
Brother-Chaplain Yves Tauran watched with outrage as the traitor Astartes advanced toward the isolated refinery tower. How could those who had sworn allegiance to the Emperor fall so far from grace? How could they spurn their oaths and descend into madness and heresy?
He pushed such questions aside. The answers were irrelevant. All that mattered was to defend the refinery tower and kill the traitors.
He activated his communications system. “Knights of Altair, prepare for battle!”
Battle for Refinery Tower Z-A19
6 933 738.M41
Primaris Continent
World of Dozaria
Strategic Setting
Since the arrival of Typhus and the sorcerer Voloh Gudag, the industrial world of Dozaria has been under attack by the forces of Chaos.
First, Voloh Gudag introduced the Kassig Plague, a virulent infection that killed billions of Imperial citizens—and turned tens of millions into mindless, violent creatures that turned on the surviving populace.
Next followed an invasion of traitor Astartes—most notably the Death Guard—who led millions of cultists and heretic soldiers in a battle for control of the ruins of what was once an economically vibrant Imperial world.
Tactical Setting
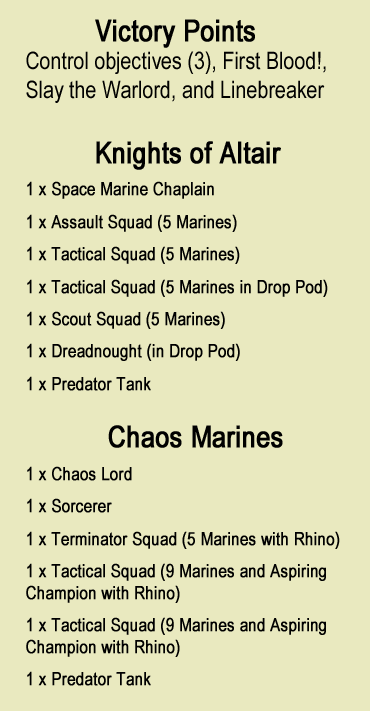
 A small force of the Knights of Altair deploy near a small promethium refinery. Their mission: To defend the refinery and destroy an approaching force of traitor Astartes.
In the great narrative of the Corvus Cluster, this is a minuscule conflict. Yet, it is the first formal Warhammer 40K battle to introduce the forces of Chaos into our four-year-long campaign. As neither TheGM nor The Gaffer have previously fielded (or faced) a Chaos force, this battle will have no impact on the ultimate fate of Dozaria.
Its story, however, has importance. No Imperial warrior fights in the Corvus Cluster without his sacrifice being documented in the ongoing history of our corner of the galaxy.
Quote of the Day: For every battle honor, a thousand heroes die alone, unsung, and unremembered.
The Combatants
 The fight for the refinery tower was relatively small in number of combatants, yet the Knights of Altair and the Chaos raiders were aggressive in their efforts to win the day.
Leading the Knights was Brother-Chaplain Yves Tauran, equipped with a jetpack and attached to the Assault Squad. To his good fortune, he was supported by ancient Boras, a centuries-old dreadnought of great power and ferocity.
All that’s known of the traitor Astartes is that they were lead by a powerful warrior who, for reasons not clear, chose to lead from the rear of his force. More prominent in the fight was an unidentified sorcerer so powerful that it appeared, for a time, as if he would win the battle single-handedly.
Imperial Turn One
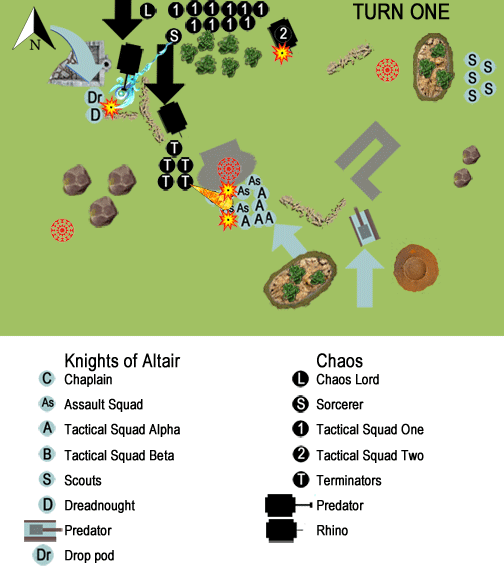
 The battle’s start is announced by the roar of a descending drop pod bearing the heraldry of the Knights of Altair.
Falling toward the ground at high speed, the drop pod’s braking thrusters begin to fire. Engulfed by smoke and flame, the atmospheric descent transport slows rapidly, but its landing is still violent, causing the ground to shake like an earthquake for a kilometer in every direction.
This is the moment the main battle line of the Knights has awaited. As one, the loyal Astartes begin their advance.
First to move forward are Tactical Squad Alpha and the Assault Squad, which run toward the tall refinery tower in the center of the battlefield. When they reach their objective, the ten Space Marines, led by Brother-Chaplain Tauran, hug the tower’s metal bulk for cover from enemy fire.
Only meters behind them, a Predator tank also advances and targets an enemy Rhino near the woods to the north of the tower. The Predator’s lascannon manages to penetrate the traitor transport, stunning its crew and passengers.
To the east, a squad of Scouts—having infiltrated the enemy flank—remain out of sight in a copse of low trees and brush. They will wait for the right moment to make their presence known.
Despite all this activity, what dominates the attention of everyone on the battlefield is the now-landed drop pod. As the smoke and flames around it begins to thin, all see the drop pod begin to open. Its hatches fall to the ground and, from its interior, strides the huge form of ancient Boras.
The dreadnought does not hesitate as it moves forward. The moment it clears the drop pod’s hatches, it turns its melta gun toward the Chaos Predator and fires.
Alas, the traitor vehicle’s armor withstands the fiery beam of Boras’ weapon.
Chaos Turn One

At the battle’s center, loyalist tactical and assault squads take cover by the refinery.
For the traitors, ancient Boras is a threat that cannot be ignored. The Chaos Predator advance to point-blank range and fires . . . and misses!
The sorcerer standing to the side of the vehicle casts Gift of Corrosion, causing Boras’ armor to rust in seconds and damaging the inner workings of his armor’s mechanics. Immediately, the dreadnought’s strength begins to weaken under the effects of the Warp-tainted spell.
Not far away, a Chaos Rhino advances toward the refinery tower. It comes to a stop, and to the dismay of all loyal Space Marines, the traitor vehicle disembarks five traitors equipped with Terminator Armor.
The traitors waste no time in their attack. One raises a flamer and targets both the tactical and assault squads at the refinery, wounding Sévin and killing one member of the Assault Squad. The other Terminators fire their Combi-Bolters, but the remaining loyal Marines are saved by the cover provided by the refinery.
The traitors’ tactical squads do little. One, deployed behind a copse of trees, moves slowly eastward under cover. The second, still embarked in their Rhino, sits in frustration as the stunned crew of their transport attempt to regain control of the vehicle.
Click here to read Part 2 of the battle.
Click here to read the conclusion of the battle.
—
The Corvus Cluster is a Warhammer 40K blog that documents our gaming adventures in the fantastical sci-fi universe of Games Workshop.
Categories: Battle Report (Tabletop), Dozaria Campaign
