The climax of the battle came when Klawtoof and Commander Lok’Ta met in single combat, surrounded by their bodyguards who offered no quarter or mercy.
Although Lok’Ta was forced to retreat from the brutal greenskin warboss, the ork’s victory was shortlived. In a classic Kauyon move, Lok’Ta used the ork’s aggressiveness to draw him into a deadly crossfire.—“The Complete History of the Al’gel Campaign” by Aun’el Mor’kan Tal’is’ta, ethereal caste, Dal’yth Sept, (689-776.M41).
The Ork Onslaught
With the arrival of dawn, the ork Trukks attempted to rush the Tau firing line. Some Trukks were slowed by rough terrain, but others manged to unload their greenskin warriors in front of the thin line of fire warriors.
With a roar, the orks charged forward. But, with their attack launched piecemeal, the defensive line of fire warriors coordinated a deadly crossfire (in the finest tradition of the Kauyon strategem) and cut down the orks before they reached the Tau line.
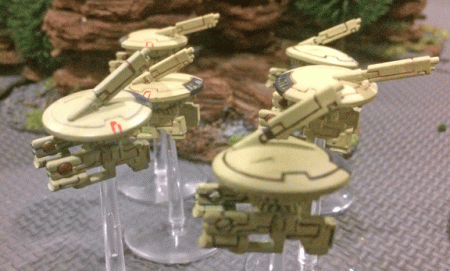
With the ork attack disrupted, Lok’Ta took the initiative. Several drone squadrons dropped on the west flank of the battlefield and wiped out a Grot force attempting to advance through some ruins. This left the ork flank wide open.

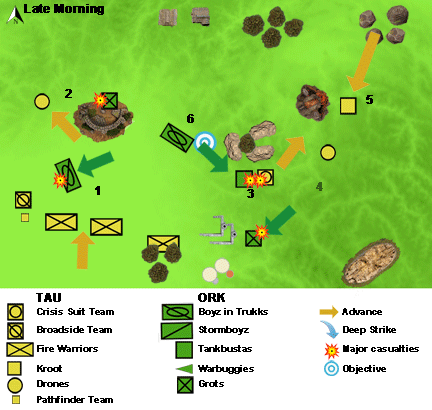
An attempt by Trukks to charge the Broadside team failed (1), while gun drones moved north to wipe out the Grots in some ruins (2). A mob of Tankbustas charge Commander Lok’Ta, who withdraws and uses firepower to wipe them out (3). More gun drones target the last advancing Grots (4), while the Kroots move up in support (5).
On the east flank, more drone squadrons dropped, as well as Lok’Ta and a team of Crisis Suits. This force dropped behind the advancing greenskin (Grot) attack and fired into the ork rear, causing severe casualties and taking most of the momentum out of this threat.
The ork offensive was shattered, but orks do not give up easily.The Tankbustas charged Lok’Ta and his Crisis Suits, forcing the Tau commander to withdraw with casualties.

Commander Lok’Ta and his bodyguard conduct a “Deep Strike” behind the greenskin attack and annihilate several warbands of Gretchin.
But, after destroying this force with concentrated fire, the Tau commander and his Crisis Suit team advanced on Klawtoof and his remaining bodyguard. The ork warboss reacted with predictable aggressive, charging at Lok’Ta. The brutal ork warrior managed to kill several of Lok’Ta’s bodyguard and injure the commander himself.
Using maneuver as a weapon, Lok’Ta fired his jet pack and withdrew from close combat, then he coordinated with nearby drones and fire warriors to bring fierce fire upon the ork warboss and his Boyz. The orks, including Klawtoof, was quickly brought down.
The day was only half over, but the battle was effectively won. More than 90 percent of the original ork attack force was killed, and almost immediately, the Tau resumed their offensive and quickly slaughtered the last of the greenskin survivors. Not a single ork survived the battle.
Aftermath

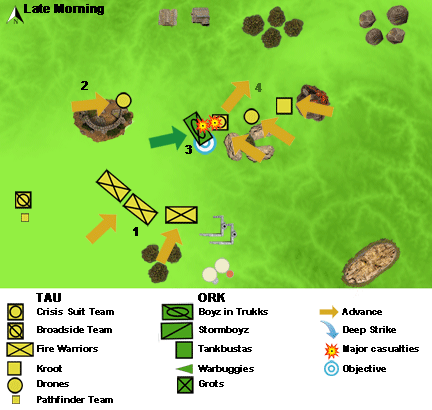
The battle comes to an end as the Tau firing line (1), gun drones (2) advance on the ork center. Commander Lok’Ta and troops under his command also advanced, only to be attacked by Klawtoof (3). Bested in melee, Lok’Ta withdrew (4), and with the ork commander surrounded, the entire Tau force opened fire and brought down the greenskin threat.
The 3rd Hunter Cadre would continue their advance for three more days before it outran its supply lines and logistical realities forced a halt to the offensive. By this point, the Tau had advanced nearly 170 kilometers and seized nearly 28,000 square kilometers of ork territory.
The 4th and 5th Cadres, facing less severe opposition, also reported gains of 20 to 50 kilometers across the Tau front.
Over the 10-day offensive, ork casualties were estimated at more than 130,000, including Klawtoof, whose corpse was positively identified and burned. Tau casualties were less than 5,000.
Victory Points
Tau Forces: Single objective (3 v.p.), First Blood (1 v.p.), Slay the Warlord (1 v.p.), Linebreaker (1 v.p.) = 6 v.p.
Ork Forces: No victory points.
TAU VICTORY!
TheGM: The battle against Klawtoof was the first serious engagement between the Tau and orks under the command of The Gaffer and myself. It went surprisingly well (for me).
The maneuverability of the Tau had a huge impact on the game, as did the Supporting Fire rules of the Tau. I’d never fully grasped how effective these abilities could affect a battle, but I won’t forget it next time around.
The next match-up won’t be as easy. The Gaffer really knew nothing of the capabilities of the Tau, so I had the advantage. But I think he recognizes the potential—and necessity—of flank attacks to disrupt the Tau firing line and keep Tau units from supporting one another.
The campaign of Al’gel II isn’t going to get easier.
Here’s the nitty gritty of our fight. It was a small battle of about 700 points.
Scenario: The Relic
Tau Forces
- Commander w/Crisis Suit (Fusion Blaster, Burst Cannon)
- 2 x Crisis Suits attached to commander (2 Burst Cannons each)
- 2 x 6-drone squadrons
- 2 x 7-member Fire Warrior squads (Shas’ui with Marker Light, Plasma Rifles)
- 10 x Kroot (Kroot Rifles)
- 4-member Pathfinder Team (Pulse Rifles)
- 1 Broadside Battlesuit (High-Utility Missile Pod, Smart MissilePod)
Ork Forces
- Warlord (Slugga and Choppa)
- 3 x 10-member mob of Gretchin w/Runtherds
- 5 Tankbustas with Boss Nob and 2 Squigs (w/Trukk)
- 2 x 12-member mobs of Boyz (one with Shootas, one with Sluggas) (w/Trukks)
- 5 x Stormboyz
- 3 x War Buggies with Rokkit Launchas
Click here to return to the battle’s beginning.
—
The Corvus Cluster is a Warhammer 40K narrative campaign documenting our wargaming adventures in the fantastical sci-fi universe of Games Workshop.
Categories: Al'gel Campaign


