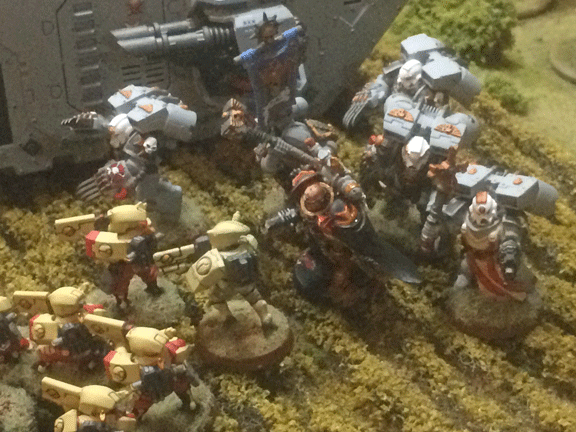
Sternguard fire poisoned boltgun shells at a squad of Fire Warriors and slaughter the xenos. Alas, soon after, massive Tau firepower guns down the elite Astartes.
“It saddens me greatly that we must take arms against the peoples of the galaxy. By their deaths, they deny themselves the liberation that is only to be found in total surrender to the Greater Good.“—Aun’Va, Master of the Undying Spirit
Imperial Turn Two
Drat it! I have a Stormtalon in reserve, and I roll poorly. This valuable asset will be late getting to the battle.
On the east flank, the Crusader Squad continues its advance, accepting that, with the retreat of its biker support, the Space Marines will be the target of the Crisis Suits next turn.
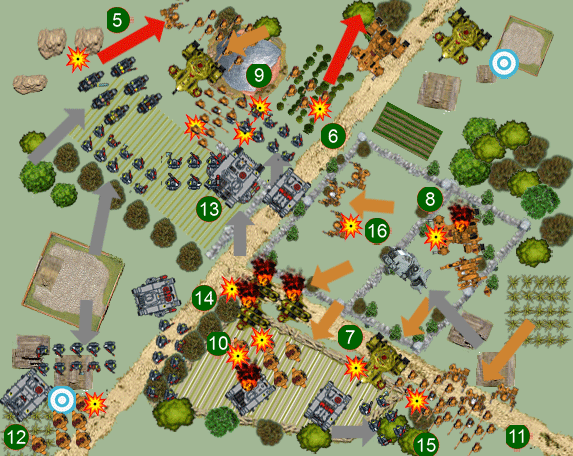
A few Marines have a line of sight on one Crisis Suit and, surprisingly, they kill it. More surprisingly, the entire squad of xenos panicks and runs off the table. Such are the dangers of positioning troops too close to the edge of your deployment zone. ![]()
As a stand-still-and-shoot kind of guy, it was probably good that there weren’t many choices to make in the center of the table. The Rhino was immobilized, with Fire Warriors, a Hammerhead, and Pathfinders to the front. Stting inside the Rhino and letting the Tau shoot up the immobilized vehicle didn’t seem a very Marine-like option for the Crusader Squad inside.
So, the squad hops out its transport’s hatch and advances on the orchard where the Pathfinders are waiting. The Marines kill two xenos, and given the quirks of a diagonal deployment zone, the Pathfinders are close enough to the edge of the table that, when they rout, they run off the board. A second xeno unit falls! ![]()
The Land Raider now faces an easy decision. It can turn right, risk bogging as it moves over the stone wall, and provide a tempting target for half the Tau army. Or, it can turn left, advance toward the orchard, and pour out of the Landraider’s assault hatch, and attack something. That’s what the Honor Guard decides it will do . . . next turn, as there is no room for it to deploy close to the xenos. Also, why make a target of itself until it’s ready to charge? You can charge from a Land Raider. Bide your time.

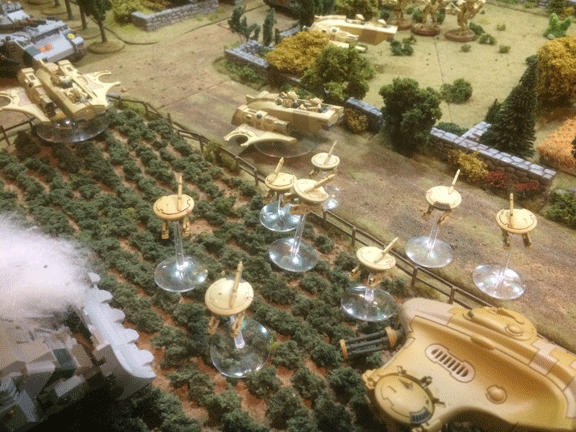
Gun drones infest a crop field on the Imperial right flank. A series of volleys by nearby Space Marine, however, destroy the threat.
The heavy tank moves left and behind the Crusader Squad. It still had a shot at the Hammerhead, although the xeno vehicle has a cover save. The shot hits, but I roll a 1 for penetration. (Insert moan here.)
On the east flank, the Sternguard sitting in the immobilized Rhino look out, see a horde of xenos approaching and decide to stay inside their metal box. If they disembark and move forward, they’ll get shot to hell. (There are only five of them.) If they move back behind the Rhino, they will be too far away to position themselves correctly to stem the Tau advance.
But, one Marine decides he can contribute somewhat. He pops out of the top hatch and fires his combo melta-boltgun and immobilizes a Devilfish that’s come alongside. ![]()
Behind the lines, at the crossroads, the Predator notices the second Hammerhead has moved, and it can be seen through a gap in the stone wall’s overgrowth. All four lascannon fire, and the Hammerhead is converted into a fiery pyre. ![]()
Oh, yes, the Whirlwind. It turns out that it had a faulty targeting array. It targets the Tau Warlord in the center field, but the shot scatters and kills a hapless Fire Warrior that is behind the lines and minding his own business. I’m not going to earn back the points I paid for this pitiful artillery piece.

Fighting is intense across the battlefield. Both flank attacks begin to lose strength, but Chapter Master Ioculus and his Honor Guard crush all opposition as they advance down the center.
Tau Turn Three
On the east flank, largely due to lousy Morale Checks, there aren’t ‘t as many xenos left. There is a single squad of Fire Warriors behind a pond. It moves up and takes a shot at the Crusader Squad advancing across the nearby crop field.
But the Marines are at the edge of the field, which was built of three-quarter-inch-thick insulation foam. Although sculpted to look like a crop field on a small rise, the high point of the field is just tall enough to block line of sight. Okay, Fire Warriors look elsewhere and target the Crusader squad coming out of the Rhino on the road. Alas, they only kill two Marines.
To add to that fire, a Devilfish advances past the pond and drops off a Breacher Squad, which opens up on the Crusader Squad. At point-blank range, their pulse blasters wipe out the Marines. I’m beginning to have some real respect for Breacher Squads. ![]()
In the center field, the Warlord and his bodyguard, all armed with fusion blasters, cannot get a shot at the Land Raider, so they move forward and target the immobilized Rhino. At least, they can try to kill its still-firing storm bolter. They so so.
The Hammerhead on the road targets the Land Raider and scores a glancing hit.
Farther south, the Piranhas release all their gun drones, and the crop field now is thick with drones. The skimmers, however, turn their attention to the Predator at the crossroads, but they either miss or their shots bounce off the tank’s armor .![]()
On the east flank, the weight of the Tau advance is becoming a serious threat to the Imperial flank. Fire Warriors disembark from the immobilized Devilish (damaged by the Sternguard) and move into nearby woods, where they are joined by another squad and three Crisis Suits with burst cannon. That’s a lot of troops to face off against the hiding Sternguard. ![]()
One surprise arrives: In the Space Marines’ rear, a squadron of gun drones “deep strikes” onto the Imperial objective and fires into the backs of the Imperial reserve, which is advancing forward. Now, the reserve will need to turn back and retake its objective. ![]()

Space Marine bikers advance deep into Tau-held territory before withdrawing from xeno fire. The squad is disgraced by its cowardice and quietly disbanded.
Imperial Turn Three
On the east flank, the bikers are back in action, and they go Flat Out! and try to get behind the Breacher Squad and Hammerhead defending the central road. If they are lucky, they can rush by and perhaps seize the Tau objective.
In the center, The Crusader Squad, which had used the slope of a crop field to screen them from xeno fire, advance toward the orchard and fires on the Breacher Squad. They kill six. The Honor Guard charges out of the Land Raider and slaughters the rest. ![]()
The Land Raider targets the Hammerhead. For the second time, the massive Marine tank strikes the xeno tank . . . and again rolls a 1 for penetration. Oh, good grief!

High Marshal Ioculus and his Honor Guard charge into a Tau Breacher Squad. Needless to say, the xenos are soon torn to shreds.
A bit back from the Land Raider, at the crossroads, the Predator opens up on the threatening skimmers that are assailing it. In the best shooting of the game, the tank takes out all three Piranhas. Huzzah! ![]()
On the east flank, the Sternguard realizes that honor demands they take aggressive action. They simply cannot sit there, and they cannot disembark and retreat. They must attack.
So, committing their souls to the Emperor, they disembark, advanec on the sizable Tau force in the nearby woods, and fire poisoned boltgun rounds at the nearest Fire Warrior Squad. The xenos are wiped out. ![]()
In the rear, there are actually two reserve Crusader Squads. One moves up to the edge of the cornfield infested with gun drones and kills two of the heretical AI devices. The other squad, which had been advancing in support of the center, turns back and charges the gun drones holding the Imperial objective. They destroy the drones and retake their objective. ![]()
The Whirlwind, true to form, scatters a shot at some Fire Warriors crossing the road on the east flank. The fire disturbs the dust but nothing more.
Finally, the Stormtalon arrives on the field. Better late then never. It targets the Warlord in the center field. Two shots hit home, but a bodyguard sacrifices himself for the Greater Good. Still, one Crisis Suit with fusion blasters is dead. ![]()
Click here to read the final chapter of this battle.
Click here to return to the beginning of this battle.
Click here to return to Part 2 of this battle.
—
The Corvus Cluster is a Warhammer 40K blog documenting our gaming adventures in the fantastical sci-fi universe of Games Workshop.
Categories: Battle Report (Tabletop), Dar Sai Campaign
