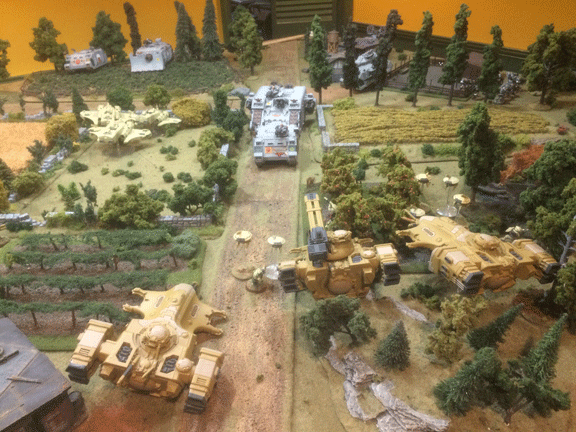
Crisis Suits, supported by a squad of Fire Warriors, occupy a small vineyard in the Tau deployment zone.
“I believe in three tenets of battle—firepower, firepower, and more firepower. Yes, courage is important. Duty is important. Honor is important. But none of these virtues will help you defeat the towering ork warlord charging at you with bestial fury and a roaring choppa blade swinging at your head.”—Captain Alaric Galba, 1st Company, Knights of Altair
Tau Turn One
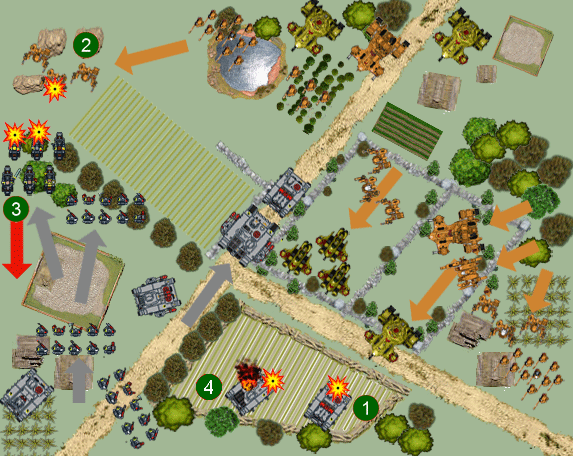
The Tau win the roll for first turn. On the western edge of the battlefield, three Crisis Suits with Burst Cannon use their jetpacks to get behind a rock formation. There are Space Marine bikers ready to rush up that flank, and the Crisis suits can hide behind the rocks, wait for the bikers to get close, then jump out and slaughter them. (Insert evil laugh here.)
At the end of the road in the center of the table is an apple orchard, where a Hammerhead tank, commanded by Longstrike, takes aim at a Rhino that obviously is going to rush up the road. If the transport can be stopped, the Land Raider behind it (the bigger threat) will have to go off-road, and the Tau commander will laugh with glee if it bogs down because of a difficult terrain roll.
The railgun’s shot hits—and penetrates—the Rhino, and I roll a 7 for the penetration damage. An explosion! Oh, wait, I’d rolled darkness for Turn One, so there is a cover save. But the Rhino needs a natural 6 to save . . . and gets it. (Insert dirty word here.)
On the eastern side of the road, there is a lovely, new set of stone walls, surrounding open fields, that quickly fill up with advancing Tau. A squadron of Piranhas go Flat Out! across one field, hoping to come to grips next turn with a Vindicator tank deployed in a crop field (and anchoring the Imperial east flank).
The Tau warlord, along with bodyguard, as well as a second Hammerhead armed with an ion cannon, also advance cautiously into the fields. The xeno tank fails in its long-range shot against the Vindicator.
On the eastern edge of the battlefield, other xeno assets also advance. Most use the cover of woods to move forward, but a Riptide walks out of the woods, takes a shot at a Rhino in the crop field to the right of the Vindicator. Its ion accelerator punches through the transport’s engine compartment and immobilizes it .![]()

The Imperials attack up the center, while their support to the west is stymied by heavy Tau fire. To the east, the Tau commit significant forces to the attack.
Imperial Turn One
Hmm. The Tau have jetpack-equipped battle suits and skimmers that can largely ignore terrain. The Imperials have tracked vehicles, and they must roll for difficult terrain. With the table amply covered with woods, fences, walls, trees, and a pond, the risk of bogging down is a real possibility.
This is going to be interesting.
Well, I’m playing my Knights as Black Templars, so there is nothing to it: Trust in the Emperor, and hurry and close with the hateful xenos.
On the west flank, my Marine bikers hurry forward but face a tactical dilemma. Those pesky Crisis Suits behind the rocks. If I advance, I’ll get two or three shots, but then they’ll pop out and fire 24 shots from their burst cannons. (Rather than equip the Crisis Suits with twin-linked weapons, I paid the extra cost to equip them with two separate burst cannons—so eight shots a suit.)
Of course, I could slow my advance, but then my advance up the west flank would not be supporting the center. That won’t do. So, while a Crusader Squad advances through some woods, the bikers roar forward and get four hits on the Tau . . . which make four armor saves. Drat! ![]()

A mechanized force of the Knights of Altair Space Marine Chapter charge down the road—right at the heart of the Tau army.
A Whirlwind targets the Crisis Suits, as well, but as would happen throughout the game, the artillery fire scatters. No effect.
Elsewhere, the Rhino and Land Raider go Flat Out! down the central road, damn the torpedoes, damn the Hammerhead right in front of them, and damn the very dangerous anti-tank weaponry of the Tau in the central field. All glory to the Emperor!
Farther back, at the crossroads, a Predator tank—heavily armed with a twin-linked lascannon on the turret and lascannon in each sponson—turns its guns toward the Piranhas. But then there is a surprise.
Bending down to model level, I discover those beautiful, new stone walls in the center of the table, so detailed with overgrowth, totally block my line of sight to the models. What! Why did I put so much overgrowth on those walls? Oh, yeah . . . that was the effect I was going for, wasn’t it?
On the east flank, the Vindicator shot scatters, and the immobilized Rhino just sits there. Not a particularly impressive first turn for my Knights of Altair.

A squadron of Piranha skimmers race across a field. Their target is an Imperial Vindicator tank, which the Piranhas quickly destroy with their fusion blasters.
Tau Turn Two
On the west flank, the Crisis Suits in the rocks predictably pop out and fire. After 24 shots, however, they only kill two bikers! But then the bikers rout and retreat. Although upset with their poor accuracy, the xenos laughed hysterically at the sight of Space Marines turning tail. ![]()
On the center road, the Hammerhead misses (good grief) in its shot against the advancing Imperial armor. In the open field nearby, the three Piranha slow down as they advance and fire their fusion blasters at the Vindicator tank. They hit; they penetrate; they blow up the tank. ![]()
First Blood to the xenos.
On the east flank, most of the Tau are content to continue their advance. The second Hammerhead tank, still in the central field, turns and fires its ion cannon at the Land Raider’s flank. It misses.
The Riptide also takes a shot at the heavy tank. It hits, penetrates, and blows up the tank. But wait! Yet again, there is a save. The sun is up, but those overgrown stone walls now work in the Imperium’s favor. They give the tank a 4+ cover save, which it makes.
The course of the entire game shifts mightily because of that one save roll.
Click here to read Part 3 of this battle.
Click here to return to the beginning of this battle.
—
The Corvus Cluster is a Warhammer 40K blog documenting our gaming adventures in the fantastical sci-fi universe of Games Workshop.
Categories: Battle Report (Tabletop), Dar Sai Campaign
