

This sizable tower dominates any game table. (It’s the camera, not tower, that’s tipsy.)
The Tau are a technologically advanced race with an elegant sense of aesthetics—and thus an architecture far different from the brutish and darkly gothic look of Imperial buildings.
As I have a sizable Tau army—and my goal is to expand the Tau presence throughout the Corvus Cluster—it seemed appropriate to begin construction of a structure appropriate to the Greater Good.
Although there are a number of small Tau terrain pieces available online, I wanted a large structure to serve as the centerpiece of a Tau battlefield. As I was wandering through my local Lowes (DYI store), I stumbled upon the perfect components for such a project: PVC plumbing pipe.
 I’m not talking about simple plastic tubes, mind you. The plumbing section of any DYI store includes a wide assortment of pipe connectors, some of which feature a ridged design to reinforce the joint where two tubes connect. As the photo above shows, these ridged areas add some valuable texture to break up the otherwise smooth (and potentially boring) surface of the tubes.
The tower consists of three 7-inch-in-diameter pipe connectors that “mate,” one inside the next, and a sizable rounded cap that was glued on the top.
As you see from these photographs, they fit together to make a dynamic 29-inch-tall tower of white.
The structure is remarkably simple, so I will highlight just the more relevant details of its construction:
Basic Construction

Insulation foam was used to reinforce the joint where the bottom tube of PVC pipe was glued to the MDF board.

Small strips of styrene were used to strengthen the joint where two PVC tubes were cemented together. The purple stain is the PVC solvent cement.
The tower is designed in two sections, so each section fits within a standard paper ream box (11-inch by 17-inch internal footprint, 13 inches tall). Much of the assembly is pretty basic, so I will only list some of the more relevant details:
- The base was cut from MDF (medium density fiberboard) and a thin plastic sheet, embossed with a cobblestone pattern, was glued on the top to provide a textured foundation for the tower.
- The bottom PVC pipe (Tube #1) was glued to the base using GOOP, an all-purpose adhesive that bonds a wide range of materials.
- To reinforce the bond between the MDF base and Tube #1, small blocks of polyurethane foam (insulation foam) was glued at the joint between base and tube. GOOP will partially dissolve the foam, but it will create a strong enough bond.
- The narrower, “female”end of Tube #2 was slipped inside Tube #1 and glued with PVC primer and solvent cement.
- The rounded top cap was embossed with the manufacturer’s logo, which had to be sanded off. The cap was then glued flush to the end of Tube #3.
- To reinforce the bond between tubes, small strips of styrene were glued over the joint lines.
- All the piping was painted with glossy white Krylon paint.

The window assembly was constructed on the inner lip of Tube #3. When assembled, the top section of the tower slides down until the windows rest atop the bottom section. The black strip of windows breaks up the dominating white of the tower.
Windows
The windows were the only challenging part of the project. Tube #3 features two distinct parts: A ridged upper section that has an outer diameter that matches the top cap, and a narrower “female” section that can be inserted into Tube #2.
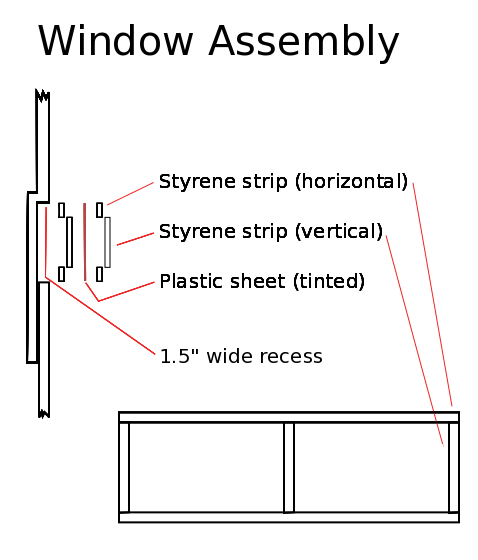
To create the window, small strips of styrene were glued horizontally along the top of the narrow section of the tube, adjacent to the ribbed section. A second strip of styrene was glued horizontally 1″ farther down the tube. Small strips were glued between these two strips to create the vertical framing.
Once these this window frame assembly was in place, the ridged end of Tube #3 was taped off to shield it from paint, and the window frams and surrounding area were painted with black spray paint.
Once the paint was dry, a strip of tinted plastic sheeting was glued to the inner window frame, and then prepainted styrene strips (black) were glued over the plastic sheet to serve as the outer window casing.
When the upper half of the tower is inserted into the half, the window assembly rests securely on the lip of the lower half of the tower, creating an indented circle of windows where the “evil xeno invaders” can survey the surrounding countryside.

A thin block of insulation foam and some Hirst Arts castings were all that was necessary to make this “iris” style doorway.

A few small pieces of PVC pipe and some aquarium plants complete the outer details.
Outer Details
- The entrance at the base of the tower was made from a square block of insulation foam, its inner surface sanded conclave to match the curve of the PVC pipe and create a tight seal.
- The iris-style match was created with castings from a Hirst Arts mold. (Med Lab Accessory Mold #303).
- A section of 1-inch-in-diameter pipe connector with interesting ridges, along with a curved connector, was used to create a section of piping rising out of the ground and entering the side of the tower.
- Finally, the base was flocked and small aquarium plants used to further the jungle theme of the surrounding terrain. Bits of Woodland Scenics’ Poly Fiber was glued to the tower sides to simulate moss growing up the side of the tower. (This could represent either a tower in a fast-growing, lush jungle—or the first signs of abandonment of a xeno ruin.)
- One feature still in the works: A 1/8th-inch-in-diameter, 1-inch-long tube was glued near the top of the tower. A future project will be the construction of an antennae array that will above the tower and add a bit more detail to the structure.
Watch Tower
To stand guard over the large tower, I purchased two solar-powered yard lights that looked appropriate for xeno watchtowers.
 I’ve only completed one tower to date. I first removed the internal wiring, including the bulb assembly. This left the glass interior of the tower empty. (I could have placed a small drop of Super Glue into the assembly to frost the windows, but I found it unnecessary. No one looks inside.)
The base is MDF, with a 2-inch-in-diameter section of PVC pipe glued to it. This simulates a small tower base, perhaps with a tiny elevator or ladder inside.
As a yard light, the light’s housing ends in a a pointed 10-inch-tall, 3/4-inch-in-diameter ground stake. To connect the light to the base, I inserted the ground stake the PVC pipe, and used GOOP to glue the base of the light’s housing to the top of the pipe.
A small hatch was built on the base of the PVC pipe out of thick cardboard, and the MDF base was flocked with hobby grass and aquarium plants.
Materials and Cost:
Large Tower: The four pieces of PVC pipe cost approximately $110, with another $10 in other supplies. (I already owned the Hirst Arts molds, but you could make the doors out of wood, styrene, or cardboard.)
Watch Tower: The light fixture cost $27, while the PVC pipe section cost approximately $2.
Final Thoughts
These were remarkably easy projects, well with the range of a beginner. I could have add more Tau-oriented features, such as a Sept sigil on the tower’s side. But I decided that any ostentatious ornamentation, as I felt the tower should appear relatively functional/industrial (for the Tau, anyway). But that’s simply a matter of personal taste.
All in all, I’m pleased with the results. I think the large tower, in particular, is a vivid centerpiece to my Tau battlefields.
—TheGM