NEWS REPORT—A major ork force has seized the Iron Spires, a barren mountain region noted for ferocious lightning storms that make travel treacherous. The Ork victory, which resulted in the destruction of half the Imperial army, places the advancing xenos just days away from the famed Tarak Mines. Military authorities reassured the public that panic wasn’t necessary . . . —Media report, dated: 3 027 735.M41
BATTLE LOCATION: Iron Spires, Hegira (Sculptor IId)
BACKGROUND: After the Fall of Veris Island (3 016 735.M41), ork activity in the Southern Continent increased dramatically. The victory of the self-styled “Kaptin” Rumlar has drawn additional troops to his command, and his marshaled forces marched to the Iron Spires—one of several invasion routes to the human-held Northern Continent.
Just before dawn on 027, Imperial forces heard the roar of ork vehicles approaching in the dark—and Imperial forces deployed with the knowledge that they were all that stood between the green-skinned xenos and the Imperial citizens who lived in the mines behind them.
SCENARIO DETAILS Mission: The Scouring
Objectives: There are six primary objectives worth 1-4 victory points (VP) each. Secondary objectives include Kill the Warboss, First Blood, and Linebreaker (1 VP each). Players: TheGaffer (orks) and TheGM (Imperial Guard)
Special Rules: According to Hegira Campaign Rules, the geography of the Iron Spires creates powerful electrical forces in the atmosphere—with the result that lightning strikes are a common occurrence. At the beginning of each player’s turn, roll a d6. On a 1, one friendly unit is randomly struck with d6 S6 attacks.
THEGM: As it happened, in 12 die rolls, not a single lightning strike was rolled. Apparently the atmospheric conditions were very calm during the battle.
Terrain: Because of the frequency of lighting strikes, there is no vegetation—only barren hills, rocky outcroppings, and craters.
Other: The rules for Reserves and Mysterious Objectives were not used—if only because the players are novices and scenarios still need to be simplified for playability. 
FORCES
Orks: Warboss with power klaw, Killer Kan, two Trukks with battering rams, two squads of 12 Ork Boyz (one with Nob), squad of 14 Gretchin.
Imperial: HQ squad, three squads (one with plasma gun, one with las cannon), Scout Sentinel with las cannon, Armored Sentinel with plasma canon, heavy weapons team (mortars).
DEPLOYMENT
The Imperial Guard set up first. Seeking to limit the orks’ use of Trukks for “Tank Shock” and allow the Guard to maximize firepower, the human commander decided to deploy in one corner of the table.
This deployment meant the Guard was protected from the Trukks by the rocky outcropping to their front. The Imperial commander believed the orks would have to approach through the narrow opening on the Guard’s right flank, meaning the Guard could use concentrated anti-armor fire to stop the Trukks—and then use volleys on the orks that would be forced to approach on foot.
If this worked, the Guard could seize the nearby objectives (achieving parity of objective VPs with the orks) and then win modestly if it accomplished the secondary objectives of “Kill the Warlord” and “First Blood.”
The ork commander’s plan was more straightforward. If the “humies” want to cower and wait to be killed, the ork commander would grant them their wish. He’d come straight “at em” and pound their heads in. Victory points? Who cares about stinkin’ victory points?

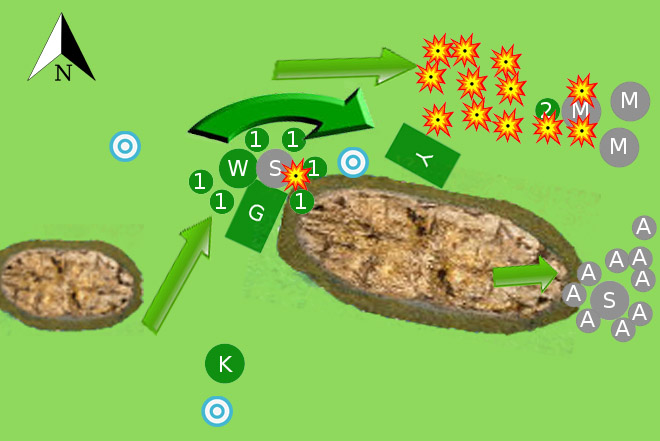
Troop Deployment and objectives with VP assigned randomly. To avoid crowding the map, only a portion of the Imperial Guard squads are shown to indicate the squads’ general locations. Only one Ork Boyz is deployed behind each Trukk to indicate the vehicle each squad rode in.
TURN ONE
Imperial Movement—As expected, the orks deployed with the intent to sweep across the open battlefield and strike the Imperial right flank. So the original battle plan remained the best strategy: Thus Alpha and Beta squads ran up to the stone outcropping before them, clambering up the sharp-edged rocks to gain a clear line of sight upon the soon-to-be-approaching orks.
The Scout Sentinel moved quickly along the left edge of the outcropping, hoping to clear the rocks and have a clear shot on the approaching xenos. Alas, the walker’s pilot found the ground rougher than expected, and he was not able to deploy completely clear of the rocks. It suddenly was clear that the initial deployment was flawed, as the Scout Sentinel’s las cannon will not be available to halt the ork Trukks.
On the right flank, Ceti Squad and the Armored Sentinel redeployed, spreading out to provide a more dispersed battle line. The HQ squad held back in reserve. The Mortar Squad also redeployed, moving closer to the edge of the battlefield and distancing itself from the suspected ork line of attack.
Imperial Fire: Night time rules were in effect this turn. With limited visibility, there was no Imperial fire.
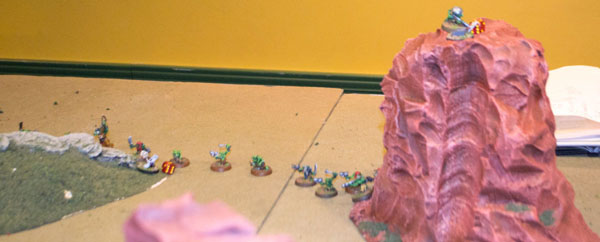
Ork Movement: The two Trukks moved “flat out” and took up a position behind an outcropping to the right of the Imperial line. The Warlord and Killa Kan followed as quickly as they could, but their more-limited mobility meant they fell behind.
The large Gretchin squad advanced on the rock outcropping to their front, but they had no intention of joining the fight. Instead, they spread out upon the rocks and formed a cheering section for their larger cousins. The Ork Boyz, happily speeding forward aboard their ramshackle vehicles, were quite happy to have the runts stay out of their fun.
Ork Fire: The Gretchin weren’t in range, and the Ork Boyz were too busy bouncing about in their Trukks to shoot.
TURN TWO
Imperial Movement: Even if the orks were in range, the Imperial Guard’s lasguns would have had no impact on the armored Trukks. (Whoops: Someone forgot that you can’t target infantry in an open-topped vehicle.)
So the troops had to satisfy themselves by completing their deployment and hoping the ork Trukks could not navigate the rocky outcropping beneath their feet.

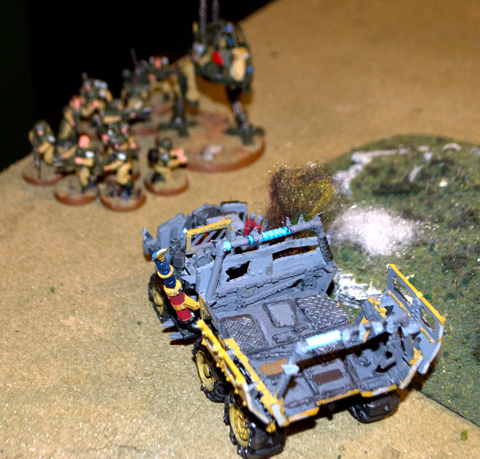
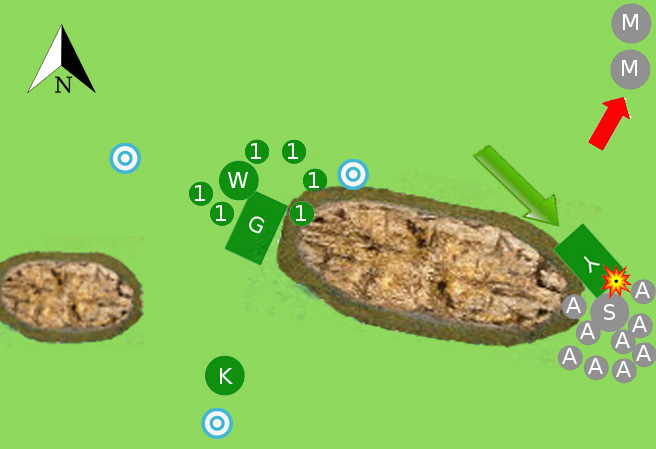
The Trukks charge the Imperial line. The Green Trukk rams the Sentinel; the Yellow Trukk comes up short.
Imperial Fire: The Scout Sentinel’s poor position left it without a line of sight (LOS) to the Trukks—the primary targets of this battle. Since maneuver had minimized its fire, the Sentinel remain stationary and took a shoot at the Warboss—and missed.
Meanwhile, the Armored Sentinel, along with Ceti Squad’s attached lascannon, had a clear shot on the ork Trukks but failed to strike home. Only the Mortar Squad managed a hit, tearing a hull point off the “Yellow” Trukk.
Ork Movement: The Warboss and Killa Kan continued their slow advance, while the Gretchin cheered their larger greenskins forward.
The Green Trukk again careened “flat out” at the Imperial line and slammed into the Armored Sentinel, causing the walker one hull point of damage. Remarkably, the ramshackle Trukk came to a stop . . . unscathed. The Yellow Trukk also advanced but failed to reach the Imperial line by inches.
Ork Fire: As the Trukks were going “flat out,” and the Warboss and Killa Kan were running, there was no fire.
TURN THREE
Imperial Movement: Most of the Imperial line began taking potshots at the Warboss, as the Ork Boyz were still encased in their Trukks. Only Ceti Squad moved, stretching out its line in anticipation of the next turn.
Imperial Fire: Every Guardsmen with a line of sight targeted the Warboss, hoping for a miracle of very high dice. But the Warboss shook off any hit he took.
Ceti Squad’s lascannon targeted the yellow truck, hoping to immobilize it and save Ceti Squad from the “Tank Shock” of a Trukk battering ram. The shot stunned the crew. The Armored Sentinel targeted the Green Trukk and blew off its front wheels. It was immobilized! No Tank Shock next turn.
Ork Movement: Clambering out of the Green Wagon were 12 Ork Boyz with shootas. These “Green Boyz” deployed in front of Beta Squad and charged.
Nearby, Ork Boyz with sluggas—accompanied by a Nob—disembarked from the Yellow Wagon, fired, and then charged Ceti Squad. Again, the Warboss and Killa Kan advanced, still struggling to catch up to their comrades now in combat.
TheGaffer: How embarrassing!
Ork Fire/Melee: The Green Boyz (Squad 1) let loose with their shootas, killing four Imperial Guard. In the subsequent charge up the outcropping, the orks lose one of da Boyz to Imperial overwatch fire, then killed the rest of the human squad in a quick fight. Beti Squad was wiped out to the last man.
Both Trukks had rocket mounts, but with both crews stunned, there was no fire from the vehicles. The “Yellow” Boyz (Squad 2 from the Yellow Trukk) charged Ceti Squad, wiping out that unit. The Boyz lost two of their own to fire on the charge. The Killa Kan lobbed a long-range shot onto the outcropping, killing one trooper in Alpha Squad.
TURN FOUR
Imperial Move: With the front line utterly destroyed, the Imperial commander had some tough decisions to make. It was critical to save the mortars for a close-in bombardment, so he sacrificed his command squad, which took up a position to block a charge on the mortars. Alpha Squad and the Mortar Squad readied themselves for the climax of the battle.
Imperial Fire: The Scout Sentinel took a final shot at the Killa Kan, before it left the Sentinel’s line of sight, and managed to immobilize it. As the battle entered the climactic finish, the xeno walker was, at least, not going to contribute to the ork attack.
The Armored Sentinel took a shot at the Yellow Trukk but missed. The walker’s pilot didn’t have much hope for his ultimate fate anyway. With Beta Squad gone, the Mortar Squad now was free to fire upon the orks on the outcropping. Two direct hits killed five of the “Green” Boyz, who turned and fled.

The Gretchin have sat out the battle but suddenly realize a high-prize objective sits atop the mesa at right.
Ork Move: It suddenly occurred to the Gretchins that the WarBoss had given them orders—grab all the loot they could.
Realizing they would face his wrath if the battle ended with no loot to hand out, the large unit began to stretch across the tabletop.
Their goal: While maintaining unit integrity (no more than 2” between them), they would climb up the mesa in the northwest corner of the battlefield and control three objectives in total—worth 8 VP.
(GM Note: After the fact, we realize that a unit can only control one objective—not the three the Gretchin were attempting to control by stretching out. Still, the most valuable objective was atop the mesa, so the race for that objective before the battle ended still had a degree of drama.)
Meanwhile, the Yellow Boyz and Nob charged the Imperial HQ Squad. Their Trukk remained still, the crew still stunned. The Warboss marched close to the Armored Sentinel.
Ork Fire/Melee: The Yellow Boyz lost one ork to incoming fire but then crushed the HQ squad. Consolidating, they were uncomfortably close to the mortars—but the heavy weapons squad has survived for one more turn—and could fire one last bombardment.
TURN FIVE
Imperial Move: The orks were too close for the mortar squad to target them, so Alpha Squad formed up around the Scout Sentinel. This allowed them to shoot through a narrow gap between the rock outcropping and the Mortar Squad. Perhaps a volley could fend off the xeno attack?
Imperial Fire: The mortars targeted the Yellow Trukk but the shot went wide. The sergeant for Alpha Squad rolled for “First Rank Fire! Second Rank Fire” and succeeded. The unit fired 27 rounds in a volley that killed four Boyz. The Nob was brought low by the Scout Sentinel’s lascannon, which incinerated the ork leader. Darn it! The Yellow Boyz made their morale check.
THEGM: A later look at the rule book revealed that only the platoon commander could order a volley. As it did nothing to change the course of the battle, we chalked up the mistake as another example of the fickle nature of warfare.
Ork Move: The Yellow Trukk rushed forward to a position near the Yellow Boyz, who were charging the Mortar Squad. The Gretchen struggled up the mesa, seeking to reach that hard-to-get objective before time runs out. The Green Boyz had rallied, and with the Warboss, they charged the Armored Sentinel that had gamely fought in isolated glory.
Ork Fire/Melee: We were not sure about the rules at the time, but we allowed the Mortar Squad to do an emergency Opportunity Fire against the charge. (We discovered later that blast weapons cannot make a Snap Shot. Ah, well. We’re still learning.)
The mortars were lucky and landed two direct hits—killing four orks. Only one ork made it into combat.
Both he and two Guardsmen were killed. The Mortar Team failed a Leadership Test, although in hindsight such a roll probably wasn’t necessary. The unit fled to the corner of the table. In the charge against the Armored Sentinel, the Boyz weapons proved useless, but the Warboss used his Power Klaw to great effect—causing five penetrating hits that sent the walker toppling over.
TURN SIX:
Imperial Move: The first wave of attack had been driven off, with the exception of a Trukk that was unlikely to be a major threat at this point. As their la guns were ineffective against the armor of the Trukk, Alpha Squad took up position behind the Sentinel so they could not be run down. The Sentinel took aim at the xeno vehicle.
Imperial Fire: The Mortar Team rallied but not in time to launch a bombardment. Alpha Squad cheered on the Sentinel, as its lascannon destroyed the Yellow Trukk’s main weapon—a vehicle-mounted Rokkit Launcha. The immediate crisis had passed; the Imperials felt they could handle a single Trukk, especially when the Warboss and handful of Green Boyz were still 18” away.
Ork Move: An exhausted Gretchin finally reached the objective on the mesa top—perhaps the Warboss wouldn’t smash in their heads after all. The Yellow Trukk rammed the Sentinel to no effect.
CONCLUSION
With the end of Turn Six, a roll of the die indicated that the sun was setting—and the battle was over. The surviving Imperial Guard units managed to withdraw to lick their wounds. At first, it was believed, the orks controlled four objectives worth 11 v.p., plus the orks had accomplished three secondary objectives: First Blood, Kill the Warlord, and Linebreaker (3 v.p. total).
A few days later, however, Kon discovered a rule that says a unit can only control one objective at a time. So the Gretchins could not have extended their line to hold three objectives. The final score was reduced from 14-to-0 to 10-to-0. While commending TheGaffer’s sportsmanship, TheGM noted, “Oh, boy, I feel so much better about the outcome.”)
The Iron Spires officially fell to the greenskins. “Kaptin” Rumlar is one step closer to domination of Hegira.
—
HEGIRA PLANETARY DEFENSE FORCE (PDF) ASSESSMENT: EST 22/311
K’NASH BUNKER – PDF SUPREME HQ
5324/11.25
INPUT DATE: 3 039 735.M41
INPUT CLEARANCE: Senior Command
AUTHOR: General Tiberius Vectrix (Hegira PDF)
TRANSMITTED: K’NASH Bunker, Hegira
TRANSMITTER: Astropath Aiden Medb
The strategic situation has taken a decided turn for the worst. This battle is the third straight defeat of the PDF against the xenos this month, and two important regions of the planet have fallen. This seriously compromises the defensive line that we were counting on to protect the Northern Continent.
It is imperative that the 728th Cadians be deployed to the Tarak Mines, as this key economic center must not be lost. If it should fall, the orks will hold a position that allows them to spread across the northern plains without opposition. The Tarak Mines are a bottleneck, our last best hope of stemming their advance.
—
The Corvus Cluster is a Warhammer 40K blog documenting our gaming adventures in the fantastical sci-fi universe of Games Workshop.
Categories: Hegira Campaign


