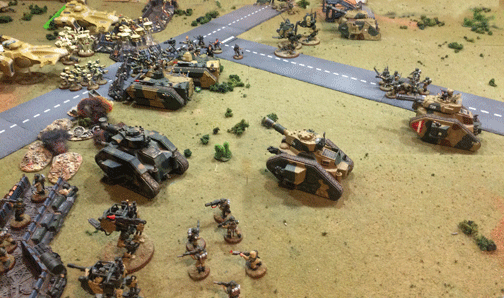
Imperial reserves, spearheaded by veteran guardsmen, seek to blunt the Tau’s seizure of the eastern trenches.
“Thank God for the flamers. The Tau fire was slaughtering us until we got in range to spray the trenches with holy promethium. The xenos were turned into screaming torches, and those not on fire ran for their lives.“—Captain Stevrous Stark, commenting on the fight for Redoubt #7.
Eastern Trenches
Ultimately, it was the fight for the eastern trenches that determined the fate of the battle.
At the beginning of the battle, this position was the subject of intense enemy fire, forcing the men to “go to ground” and simply pray they were no killed by a random artillery fire.
The most pivotal decision of the battle was made by Captain Stark. It was accepted practice among Imperial officers, given the danger of Tau combat suits dropping behind friendly lines, to maintain a strong reserve until the Tau totally committed their air-borne troops. Stark ordered all reserves forward immediately.
It was a calculated risk. As he was advancing, he had sufficient reserves to spread out and make it difficult for air-dropped troops to find a safe landing zone. His hope was that the Tau commander would fear his air-borne troops would be isolated and vulnerable to counterattack, and any “deep strikes” his line would be cancelled. As it turned out, the Tau did, indeed, consider the risks too high, and their troops never attempted to drop behind Imperial lines.
By stymieing the xenos’ original plans, Stark was able to get a sizable mechanized force moving forward at once. In the advance: two Battle Tanks, a Vanquisher, a Punisher, two Sentinel squadrons, and two Chimeras filled with Veteran Squads, and Conscript troops on foot. .
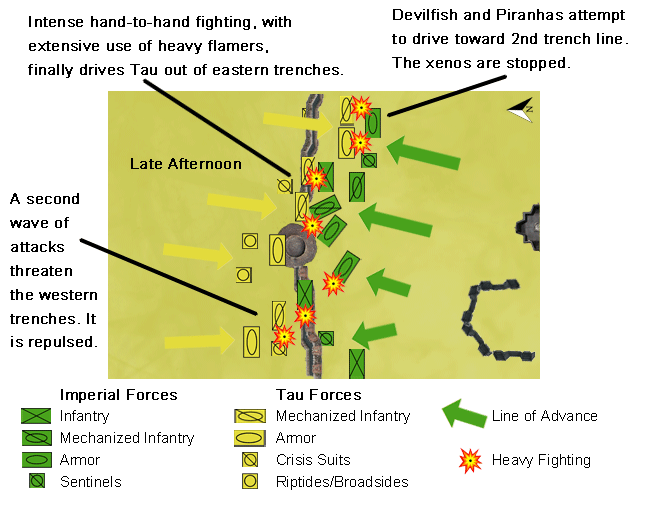
This reserve reached the front lines too late to save the trenches—but just in time to oppose a complete breakthrough. A charge by massive numbers of Fire Warriors and Breacher Treams, supported by Devilfish transports and gun drones, slaughtered every guardsmen in the trenches. They then used the trenches against the advancing Imperial troops.
Hand-to-Hand Fighting
The battle eventually reached its critical moment. On the far eastern edge of the battle, a Devilfish and Piranha swept over the trench lines, attempting to drive past the advancing Imperial reserves and create an opening for follow-up troops.
At the same time, hand-to-hand fighting broke out as Imperial infantry sought to retake the trenches, and Imperial tanks closed within point-blank range of the advancing xeno armor.
Both Veteran Squads suffered heavy casualties—and the massive unit of Conscripts was destroyed—by the high-rate of fire from xeno burst cannons, and the high-velocity, high-powered rounds of pulse blasters and pulse rifles.
In the end, the Imperial attack succeeded because of an advancing Punisher’s gatling gun and the heavy flamers of supporting Chimeras. The flamers, in particular, were a terror to the xenos, who would break and run at the sight of flames turning in their direction.
As the day waned, the Vanquisher tank took out the Devilfish that threatened to break through the lines and then destroyed the only Hammerhead supporting the xeno attack. A special weapons team, armed with meltaguns, stopped the Piranha.
By battle’s end, the ground was littered with corpses, and there were no xenos left to kill.

A Tau Breacher Team forms a firing line in the eastern trenches, resulting in horrific casualties to advancing Imperial troops. In the end, though, the xenos were defeated.
Pyrrhic Victory
Although the Imperial defenses held, there were so few Imperial troops on the field that Imperial officers could hardly claim victory. What’s more, although the Tau attack against Redoubt #7 was repulsed, other attacks on the city’s defenses caused significant casualties, and the xenos ultimately penetrated the city’s fortifications in several places.
In the end, Captain Stark determined that he did not have the resources remaining to hold the city’s outer defenses, and the order was given to pull back to the city’s center, shorten the Imperial defensive lines, and begin evacuating the civilian population. It was not yet clear that the Imperial Guard would surrender the city—but, whether they stood or retreated, the city would become a hellhole that could not support a civilian population.
Victory Points: According to the scenario, the attacker wins a major victory if he has any units in the secondary deployment zone of the defender; a minor victory if the points of his surviving units outnumber those of the defender in the first deployment zone. As it stood, the Imperials had 620 points of troops in the first zone, with the Tau having only 550. The result was a Minor Imperial Victory.

Conscripts advance on the Tau. The minimally trained guardsmen were slaughtered before they could close with the xenos, but their immense numbers attracted considerable Tau fire, allowing the better-trained—and more effective—veteran squads to launch an effective atttack.
Final Thoughts: This was a hard-fought with both armies smashing away at each other at point-blank range. On both flanks, the Tau appeared to have a dominant lead halfway through the game, and the loss of the redoubt was devastating.
But the order to advance the Imperial units from the second deployment zone—yet spread out the troops so a “deep strike” was suicidal—prevented the Tau from dropping Crisis Suits behind Imperial lines. That, plus an aggressive counterattack by the reserves, won the day.
I hope the Tau didn’t get the shaft because of a rules interpretation. The Tau were allowed to bring destroyed units back into the game, with the rules saying they could be redeployed within 6 inches of their table’s edge. But I felt unhappy that it didn’t clarify that a “deep strike” was not allowed. Was that the designers’ intent, or did they just not think about deep-striking when they wrote the rule? I went with the rules as written, but it could have made a big difference if Crisis Suits, armed with fusion blasters, could have dropped on Turn Four behind some Imperial tanks.
There’s one battle left for the mini-campaign for Port Aruna. It’s been fought, and I’ll get the report written up as soon as I can.—TheGM
Click here to return to the beginning of the battle.
—
The Corvus Cluster is a Warhammer 40K blog documenting our gaming adventures in the fantastical sci-fi universe of Games Workshop.
Categories: Battle Report (Narrative), Dar Sai Campaign


Great battle report GM. Good to see you got something to do solo. I liked the maps they really add to the report. Good to see Capt. Stevrous Stark was fast acting to help the forces of the Imperium.
Looked like a real blood bath but I am glad the Xenos lost for a change. Good job GM keep it up.
LikeLike