SICKENING REALIZATION
Standing outside his burning Rhino, Brother-Sergeant Gulterus took a moment to assess the tactical situation. He didn’t like what he saw.
The battlefield was strewn with burning Rhinos and Predators, and all he could see as he looked south was a sea of green marching north. His squad, meanwhile, was isolated and unsupported.
“Alpha Three to Squad Gulterus.”
There was a hint of fatalism in Basina’s voice as the senior Battle-Brother spoke over the vox. That worried Gulterus.
“Gulterus here.”
“My line is crumbling,” Basina said. “If you don’t hear from me again in the next two minutes, take command.”
Despite his psyche training, Gulterus felt his stomach tighten. He had no words—nor were any required.
“Affirmative,” Gulterus said finally. “Death to the enemy.”
Basina didn’t reply.
IMPERIAL TURN FIVE
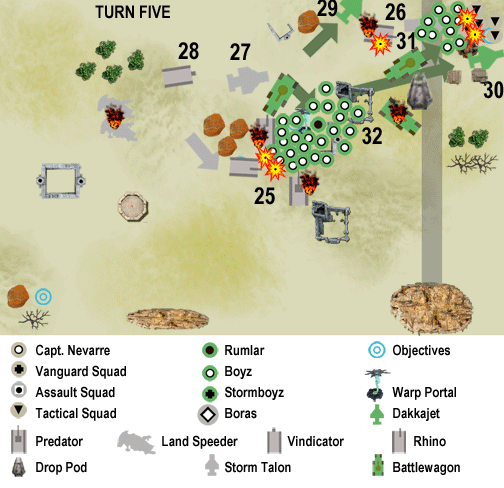
 The Rhino racing to support the center sees their fellow Knights fall under a flood of greenskins. (25) The embarked Tactical Squad knows it cannot successfully stand up to the horde of orks in front of it, so it doesn’t disembark. Instead, the Rhino decides to “Tank Shock” the greenskin mob and, hopefully, force them away from the objective.
It does not work. Although several orks are crushed by the heavy transport, the rest simply step aside and begin pounding on the hull of the Rhino. The objective remains contested.
In the upper-right corner, Squad Gulterus races to the nearby objective. The battle is nearly over. Still, if the Knights can seize enough objectives, they might yet pull out a draw. (26)
The Storm Talon decides to hover, so it can target the side armor of a Battlewagon. Its shots, however, fail to penetrate. (27). The Vindicator (28) fire is equally ineffective.
ORK TURN FIVE
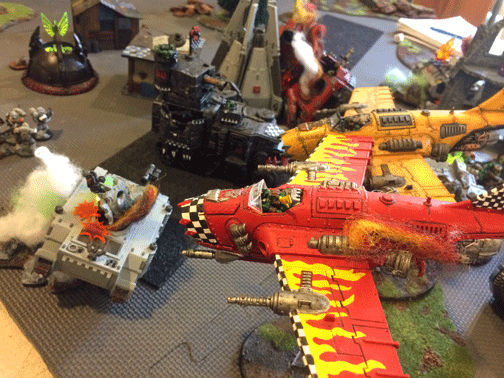
One Dakkajet cannot turn fast enough to obtain a firing target, so it flies off the table. (29. The second aircraft can just barely turn to face Squad Gulterus, but, to fire, it must stop above some terrain to keep the squad in its firing sights (30). As its base cannot find a steady footing, it is forced to abort its attack run and leave the table.
A fight arises at the top-right objective. A horde of orks, suddenly disembarking from the nearby Battlewagon, swarms all over Squad Gulterus. The squad is wiped out. (31)
At this point, the greenskins appear to have victory in their grasp. But Rumlar has lost interest in the fight. Here is his moment to finally raise his own fist against the “humies,” yet, in his first appearance on a Hegira battlefield, he disembarks and ignores the fighting to the south.
Instead, he orders his bodyguard of troops to seize the undefended Warp Portal. There, he rests on his green haunches and stares into the “shiny lights.” (32) (See also Fortune and Glory, July 7 post.)
NOTHING BUT GREEN
As darkness falls, a single Storm Talon patrols the skies above the battlefield. The Dakkajets are gone, but the aircraft’s pilot is busy, firing at the victorious orks as they chase after the retreating Knights.
Only two Imperial vehicles race away from the battlefield: In the lead, is the sole surviving Rhino with its Tactical Squad. Trailing behind is the battered Vindicator.
Unbeknownst to the Knights—and the victorious orks—there are a few other survivors making their way off the field. A handful of survivors, including a chastened Captain Nevarre and a severely injured Chaplain Sévin, will eventually make their way back to friendly lines.
Another survivor will be Ancient Boras, who finally punches his way out of the Drop Pod.
As all retreat, they see the truth of the battle’s outcome: The Barad Mine is aflame. The orks have entered the mining complex, and the retreating Imperial troops are burning everything so the xenos cannot take advantage of its industrial facilities.
All know what the loss of the mining complex means to the war. The road to Hegira’s capital city is open. Beyond that lies the strategically vital Palatine Space Port.
If the orks take the space port, Hegira falls.
CONCLUSION
The game ends on Turn Five. The orks hold two objectives, along with achieving First Blood and Slay the Warlord (although Nevarre’s loss really wasn’t “earned” by the orks).
The Knights of Altaire contest one objective with the orks and can claim the Line Breaker secondary objective, as the Vindicator is deep in ork territory.
ORK VICTORY! (8 v.p. to 1 v.p.)

The Gaffer has a special, converted figure in mind for “Kaptin” Rumlar, the ork overlord on Hegira. But it’s not complete yet, so this ork warlord served as a stand-in for the greatest ork in the Corvus Cluster.
TheGM: I’m becoming very wary of Deep Strikes. I tried multiple Deep Strikes in this fight to protect my best units from the heavy weapons of the Battlewagons and Dakkajets. But I seem to invariably suffer a Deep Strike mishap in battle—or I scatter right in front of my enemy’s guns.
I need a new strategy for using jetpack-equipped troops.
As to what happened to Boras, I’m just embarrassed. If I had landed on target, Boras could have used his anti-armor weaponry to attack the Battlewagons and force the orks to disembark and face my stronger firepower.
Instead, Ancient Boras was trapped. I really should have disembarked immediately rather than get “clever” and use the Drop Pod for protection. Dumb, dumb, dumb.
Given that I lost my best troops in the first two turns (agh!), I think the Knights did okay otherwise. They just were wrong-footed early on, and they never recovered. But my troops made a good fight of it. With a little luck, the fight still could have gone my way.
Putting aside all of this, I have to say I really don’t like that Rumlar makes his first appearance on the tabletop—only to expose himself to a Warp Portal.
It’s bad enough that The Gaffer, without warning, plops a rift in the fabric of the universe onto the surface of Hegira. But, with the fall of the Barad Mine, Rumlar is only one battle away from the key Palatine Space Port.
If the port falls to the orks, it could be the end of the four-year war on Hegira. Who knows where Rumlar may go next? What if the Warp makes Rumlar even more dangerous? Do I need this headache?
Things are getting interesting.
The Gaffer: This was the first mash-up with the space marines. The GM does a fair bit of solo play, so he has a good idea of what his troops can do, leaving me at a disadvantage. He’s also now fighting an aggressive battle of maneuver (which makes for a very enjoyable game.). Ironically, the orks are having to use humie tactics and keep up a strong defensive position, relying on shooting, as a base of fire and a reserve counterattack force.
I was hoping the battlewagons would be more effective in maneuvering, but with so many opposing armored vehicles, I had to keep them together otherwise they would get picked off one by one. The dreadnought landing in my rear-flank had to be dealt with. Fortunately there was some wine nearby to pair with the cheesy move that was very un-orky. Pulling the wagons up to the drop pod blocked the ramps, and the buildings added additional protection to the vulnerable rear of the vehicle.
The dakkajets proved surprisingly effective against the rhinos. I have to rely on air power to provide some force multipliers and they usually come through…for now.
The stormboyz were to be my maneuver element on the ground, but got wiped out fairly quickly. I expected that, and fortunately they were able to take out the remains of a squad.
It was a pretty cheesy win, but a win nonetheless. However, the narrative is now more interesting than trying to win the campaign. What other denizens of the ‘verse will make their appearance?
I’ve focused on building terrain and scenery for most of the campaign, but now have time to devote to painting units. We’ll see what happens next as I build up my forces.
Imperial Order of Battle
- Captain Nevarre, with Jetpack, Combi-Flamer, Lightning Claw
- Chaplain Sévin, with Jetpack, Power Maul, Bolter Pistol
- Ancient Boras (Dreadnought), with Powerfist/Storm Bolter and Multi-Meta, in Drop Pod
- Vanguard Squad (3 marines with Lightning Claws, 2 with Thunder Hammers and Shields, all with jetpacks) (Nevarre attached)
- Attack Squad (5 marines with Jetpacks, Power Swords, Bolt Pistols) (Sévin attached)
- 3 x Tactical Squads (5 marines each, with one Flamer or Melta, embarked in Rhinos)
- Predator Tank (twin-linked Lascannons)
- Vindicator Tank (Demolisher Cannon)
- Storm Talon (twin-linked Assault Cannons)
- 2 x Land Speeders (Heavy Bolters)
Ork Order of Battle
- Kaptin Rumlar (Badrukk stats)
- Stormboyz (9 + Nob (with Jetpacks)
- 2 x Dakkajets (with 3 Supa Shootas each)
- Ork mob (19 + Nob, with Shootas,), with Battlewagom armed with Big Shoota
- Ork mob (19 +Nob, with Sluggas), with Battlewagon armed with Big Shoota
- Ork mob (15 orks, with Sluggas), with Battlewagon armed with Big Shoota
Click here to read Part 1 of the battle.
Click here to read Part 2 of the battle.
—
The Corvus Cluster is a Warhammer 40K blog documenting our wargaming adventures in the fantastical sci-fi universe of Game
Categories: Battle Report (Tabletop), Hegira Campaign, Orks, Warhammer 40k


