

By adding two-and-a-half-inch-long needles to the base of my tree trunks, my jungle trees appear to be growing right out of the ground. (Yes, the grass still needs to be dyed green.)
In preparation for the Shorehammer 2023 convention, I’m building a jungle table. But I had this idea to rid myself of the large bases that usually are part of tabletop trees.
Why? I’ve got quite a few trees with bases, and I’ll keep using them. But, for Shorehammer, I decided to build a battle mat using teddy bear fur. I want to simulate an African savanna, with pockets of thicker jungle.
I couldn’t see how to build bases that would seamlessly blend in with three-dimensional fur, so I decided to explore a technique that will allow my jungle trees to rise naturally out of the ground.
I came up with the idea of putting needles into the base of my trees. If I place a layer of insulation foam under my battle mat, I can just stick the needles through the mat and into the foam. My trees will stand tall on their own.
Most gamers have built their share of trees, so I’m only going to share a few lessons I’ve learned during this project. Maybe it’ll give you some ideas for your next tree-building project.
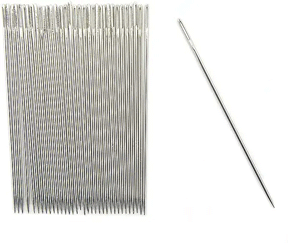
You can find long needles on Amazon. The price a package of 25 needles ranges from $4 to $11, depending on the supplier.
Using needles: I decided I wanted 2-and-a-half-inch-long pins. Given the foliage on my trees, they would be top-heavy, and if the pin wasn’t long and thick enough, the trees would lean.
I couldn’t find any pins that were long enough, but I found plenty of needles—thick, strong, and able to get a good grip into the foam.
They were easy to install in my trees. I started with seven-inch-tall plastic trees from Woodland Scenics.. I cut off the plastic peg on the bottom of the tree trunk, drilled a hole, and installed a needle about one-half-inch deep with Super Glue.
Make sure the hole is just barely large enough for the top of the needle (the end with the thread hole). You want the needle to be snug, so the Super Glue doesn’t have to do all the work of keeping it in place.
Understand there is a downside to using such large needles. With two inches of needle sticking out of the tree, you need to put two-inch-thick foam under the mat. For my nine-foot-by-five-foot table, that amount of foam creates a storage issue.
But I think the downside is outweighed by the upside: My trees appear to rise out of the grass (because they do), and I can plant a tree on a slope and still have the tree rise vertically as in nature.

Using one- to three-inch-tall trees, I can add branches to my large jungle trees. After I glue on the branches, I use Green Stuff or Apoxie Sculpt (epoxy clay) to hide any connection seams.
• More branches: The branch system of a real tree is complex, but Woodland Scenic trees have a limited number of branches. To thicken the branch system, I used smaller-scale trees (one to three inches tall) as branches.
I advise cutting off the plastic pegs on the bottom of the small tree trunks. They’re designed to plug into a small plastic base, but the pegs don’t hold up well to handling over the years.
I snipped them off, drilled holes in the bases, and added small lengths of thick wire as new pegs. Then I glued them into holes I drilled into the trunk of my larger trees, where I thought a branch was needed. A little Super Glue holds them in place.
To hide the seams when the branches meet the trunk, I applied a layer of Aves’ Apoxie Sculpt. It’s a lot like Green Stuff, but it’s a bit softer and is a lot cheaper.
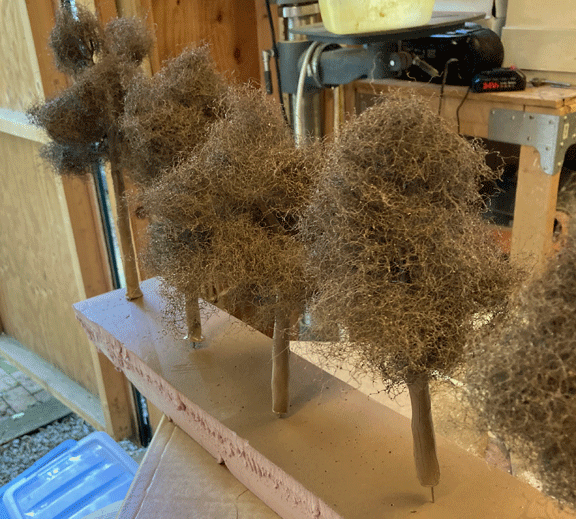
In the lower right, you can see a portion of the needle at the base of a tree. The branch system is furnace filter, although I overdid it. The filter mesh should be thinner, stretched out, and applied sparingly. Whoops.
• Taller Trees: I don’t like a table of seven-inch-tall trees. It just doesn’t work for me. Most tabletop trees are, to scale, representative of a medium-height tree. The majority of trees are, in scale, 12″ to 16″ in height. What’s more, there should be a variety of heights.
Thus all of my new trees are 12″ to 16″ in height, their plastic trunks extended by a wood dowel. The pegs at the bottom of the tallest Woodland Scenics trees are sturdy enough to use, so I don’t replace them with wire.
To lengthen my trees, I cut a number of three- to five-inch dowels. On one end, I drill a .hole large enough that the trees’ plastic pegs slip in snugly. On the other end, I drill a hole that is appropriate for a needle.
• Trunk Detail
One issue with a very tall tree is that the trunk is much more visible. You obviously need to hide the seam where the dowel and plastic tree meet, but it’s also a good idea to add some trunk detail. Otherwise, it’s more likely people will notice that your long tree is very smooth and unrealistic.
My solution is to wrap a thin layer of Apoxy Sculpt around the dowel. Using wet fingers, I spread out the epoxy clay and work it until the seam disappears. I add enough to cover the trunk of the tree from it base to its lower branches. , (Foliage will hide the upper trunk.)
I wait until the clay begins to harden then take a sculpting tool (or dull X-acto blade) and draw a bunch of vertical lines in the truck as bark texture. With some trees, I used an alternative method: I covere the clay with PVA glue and sprinkled on a thin coat of tile grout.
Easy Painting: I use the cheapest spray paint+Primer that I can find—whatever shade of brown that appeals to me. After this coat dries, I use light washes of gray, black, brown, and green (slapping on one wash each day) to give it a non-uniform look that, to me, appears more natural.
If you detailed texture to your tree trunks,, you also can give them a quick dry-brush to add a sense of depth.
Obviously use flat paint (satin in a pinch). Then finish it off with a flat varnish overcoat.

At top is a Woodland Scencics Product known as Poly Fiber, a synthetic fiber you can use to represent the thin outer leaf structure of a tree. You’ll need to apply foam or plastic leaves atop it to simulate tree foliage.
Below is a sheet of furnace fiber mesh. I spray-paint mine the same brown as the tree trunk and branches, and then I add foliage. Furnace fiber is cheaper than Poly Fiber, but it doesn’t stretch as easily.
The absolutely best-looking trees are made using Sea Foam, a type of tumblewood that is used by model railroaders. As it’s a natural product, it’s unsurpassed for creating a tree. Alas, it’s terribly fragile, and even though I dipped the Seafoam in rubber latex to strengthen the branches, you have to store and handle the trees carefully. They break over time.
Furnace Filter: Many years ago , I simply glued large chunks of colored foam to my plastic trees. It worked, but this time around, I wanted my new jungle trees to be tad more realistic.
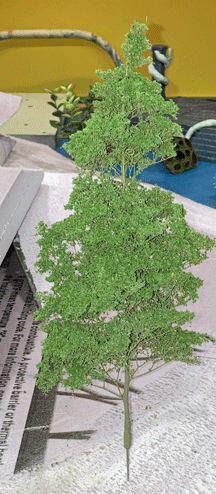
If you look at a real tree, the foliage is not a solid clump. In some places, the leaves are thin enough to see through. In other places, there are gaps in the branches.
The photo at right is a good example of a realistic looking tree. It was made using Seafoam, a type of tumbleweed that mimics the branch structure of natural vegetation because, well, it’s a natural branch system.
Model railroaders use Seafoam a lot, and I’ve made about 20 trees using this method. Alas, the stuff is delicate. If you sneeze on it, it’ll break. I tried a technique to toughen up these trees, dipping the branches in rubber latex (the idea is that the rubber coating holds the fragile branches together if they break, thus making the tree more durable).
I’d say it does add durability.. But I’m skeptical that these trees will survive long. So, I’ve built the majority of my jungle trees using jungle filters as the smaller branch structure—the support system for my artificial leaves.
I’m not talking about the common filters encased in cardboard or plastic. If you look around, you can still find the free-standing filter mesh as seen in the photo above (the blue sheet).
This type of filter is a sheet of intertwined plastic fibers, a mesh perhaps one-half to three-quarters of an inch thick. I tear off clumps of this mesh, pull it part until it’s a thinned sheet of the right shape, then stretch it across the plastic branches of a tree. I use tacky glue (specifically Hob-E-Tac from Woodland Scenics).
If you use tacky glue, read the instructions. Coat the branches with glue, and let it set for 30 minutes before you start adding the mesh. It took me several attempts before I realized that, by letting the glue partially set, it’s easier for the filter mesh to stick.)
Try not to use too much filter. I applied mine way too thick, and I failed to achieve the realistic look I was seeking. Apply sparsely at first. You can always add more filter later.
As to painting, I used the same spray paint I used for the plastic trees. I usually spray paint the mesh sheet before using it. But, one day, I was lazy and just added the unpainted filter to a painted tree, then gave the tree another coat of paint. It worked just fine.

Super Leaf consists of extremely small, plastic leaves that you can sprinkle on your furnace filter or Poly Fiber. It’s got a slight sheen, so you need to spray it with a dull varnish coat. Super Leaf is available through Scenic Express.
Foliage: My early trees used clumps of Woodland Scenics foam as foliage. But I wanted to try something new, and I settled on Scenic Express medium green foliage (essentially small plastic leaves). It’s called Super Leaf.
After applying a quick spray of adhesive glue to the filter mesh on my trees, my goal was to lightly sprinkle the leaves over the tree. Alas, reality did not meet my expectations. I put too much mesh on the trees, and then I went overboard with the leaves.
The trees were a bit lumpy looking. That was a little disappointing, although the trees are still usable.

Super Leaf poured out of the box.
A Better Job: I made a few mistakes, so I’ll share some “lessons learned.”
• Don’t skimp on texturing the tree trunks. It’s tempting to save time and just paint the tree trunks. I did that with a few trees, but I wish I hadn’t. The trees with textured trunks look much better, and the trees with smooth trunks will be consigned to the center of the jungle.
• Go sparse on filter mesh. I can’t repeat this enough. If you want a natural branch structure for your trees, don’t overdo the mesh. Use small clumps, and try to stretch it thin. Tear off gaps. Make it uneven.
And don’t worry about covering the entire tree. Just get the right look You can always go back and add more, but you don’t want a tree that’s a solid blob of mesh.
• Do the same with the leaves. If your filter mesh is stretched thin and sparse, it’s okay if, after you sprinkle on the leaves, some of the mesh shows through here and there. And if you’ve limited your use of furnace filter, there won’t be much mesh showing.
Also, again, you can always add more leaves if you feel the need.
All in all, this project is a success. I wish I’d realized my “better job” tips before most of my trees were done, but despite such mistakes, they will serve me well for years to come.—TheGM
—
The Corvus Cluster is a Warhammer 40K blog documenting our hobby adventures in the fantastical sci-fi universe of Games Workshop.
Categories: Terrain
