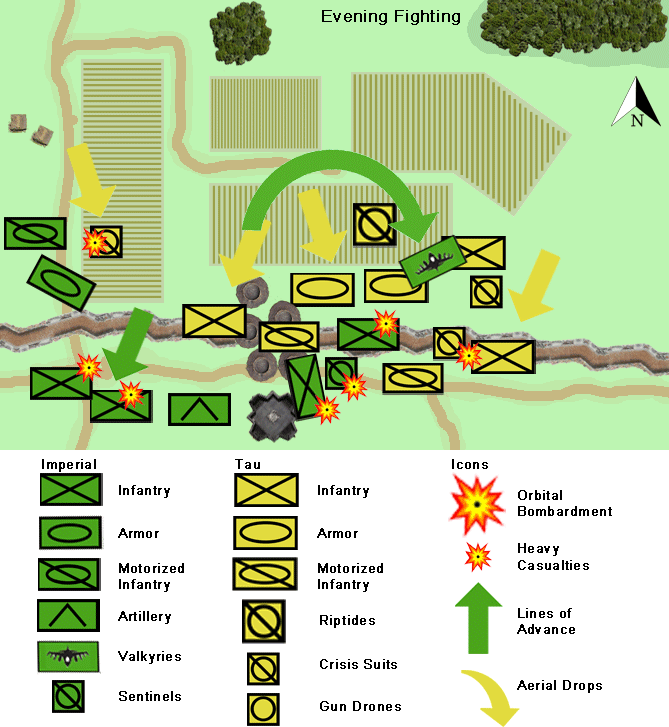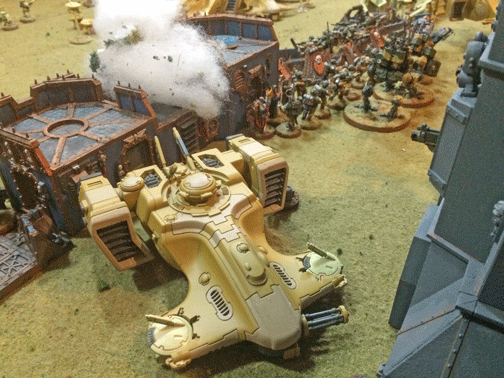
After Crisis Suits clear the trenches on the right flank, xeno transport craff [Classification: Devilfish] ferry Fire Warriors deep into the Imperial defenses.
Desperate Fighting
Despite their losses, the Imperials were determined to hang on. One Sentinel targeted a Devilfish and destroyed it, forcing its Fire Warriors to disembark. Several were killed by lasgun fire.
A squad of Bullgryns focuse on the threat of the Devilfish that was inside the trench line. They opened up with their grenadier gauntlets, but the shots went wide and inadvertently killed two guardsmen firing a heavy bolter. Whoops.
On the west flank, the Imperial armor and a Chimera advanced on the Crisis Suit team that wass threatening the trench line. Despite the risks, all opened up at point-blank range. Thankfully, the shots of the battle cannons did not scatter and harm the Chimera. Also taking a chance was a Wyvern artillery gun, which also dropped several rounds on the Crisis Suits. Two xenos were killed, as was a gun drone.
Tabletop Notes: The Valkyrie had been flying over the battlefield since Turn 2, yet although heavily armored, it had only managed to kill seven Fire Warriors. The crew of this aircraft may wish to inflate their tally in after-action reports . . . or fly north and join the xeno auxiliaries.
 War of Attrition
Key reinforcements exploited the hole in the Imperial trench line. A breacher team disembarked from a Devilfish and fired with their pulse blasters, taking down the Bullgryns (despite the protection of their slab shields). A Crisis Suit team with fusion blasters, which spent the entire battle crossing “no man’s land,”advanced into range and targeted a Sentinel squadron and killed one walker.
On the far flank, a Broadside killed four infantry on the trench line, leaving only a handful to defend the 60-meter stretch of trenches. A lone Crisis Suit, the sole survivor on this flank, killed another two guardsmen.
In yet another example of inept shooting, an ion cannon on a Hammerhead misfired, sending its beam of energy into the side armor of the Hammerhead commanded by the Tau tank ace. It wass, thankfully, only a glancing blow, but it stuned the tank ace and his crew.
Tabletop Notes: The Imperial force is nearby annihilated, but the Tau forces are thinning out, too. This has been an ugly fight.

Another Devilfish transport penetrates the Imperial defenses. Soon after, the few surviving guardsmen on the line broke and ran.
Dusk Falls
Leaderless, with few infantry still standing, there really was nothing the Imperials could do but consolidate around key positions. (ie. Make sure they held as many objectives as possible.)
The breacher team took heavy casualties from the remaining guardsmen, but there were now two large gaps in the Imperial lines—and no way to fill them. The trenches could not be held.
The order to withdraw was given, and the Imperial army fell during the night and began the retreat toward Aruna.
Tabletop Notes: As the victory points below will indicate, the Imperials technically won. But they were mauled and could not hold their position. I will split the difference—and declare victory for both sides.
Victory Points
Imperial: 3 Objectives (9 v.p.) and First Blood (1 v.p.) = 10 v.p.
Tau: 1 Objective (3 v.p.) and Slay the Warlord (1 v.p.) = 4 v.p.
Imperial Strategic Victory; Tau Tactical Victory
—
TheGM: Before the battle began, I worried that the Tau faced an impossible task in seizing the heavily fortified Imperial lines. Then, the Firestorm attacks at the beginning of the battle did poorly, two Deep Strikes led to mishaps that put two key squads of Crisis Suits on the far side of the table, and Tau fire was largely negated by the 4+ save of the trenches.
I really thought the Tau would be repulsed.
It didn’t turn out that way. Imperial fire was abysmal, and the Tau—by focusing almost all their assets on the east flank of the trench line—started to make headway. By the end of the fight, the Tau were established in the Imperial deployment zone, and there were almost no Imperial troops left.
Still, the Imperials won on points. So, both sides get something. The Tau took the position, so it’s a tactical victory for them. The Imperials win a strategic victory. They gave the Tau a good bloodletting, and with their extra 6 v.p., that’ll count heavily for them when we tally up the victory points to determine victory at the end of the campaign.
Now we can move on to Battle #2. The Tau have broken through the lines, and they are going to hound the retreating Imperials. The march to Port Aruna is on!
Click here to return to the beginning of the battle.
Click here to return to Part 2 of this battle report.
—
The Corvus Cluster is a Warhammer 40K blog documenting our gaming adventures in the fantastical sci-fi universe of Games Workshop.
Categories: Battle Report (Tabletop), Dar Sai Campaign

Great narrative battle report. It is good to see the Tau loose a battle if only in part. I was starting to wonder about the imperial commanders they tend to be defeated all the time. Perhaps the commissars need to have a talk with them.
LikeLiked by 1 person